Adding a Case
1. Click the MyCompliance tab at the top of the screen and the Cases created by me menu option underneath the tabs.

2. Select Add a Case from the Actions list (the section with the light orange background). The Add a Case page is displayed.
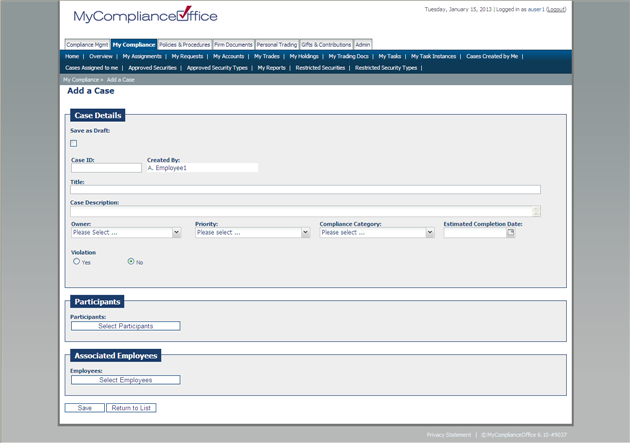
3. Enter the following:
• Save as Draft: Check this box if you want to create a draft case. Draft cases are fully editable cases which do not have an audit trail i.e. Full History will not track any changes to a draft case. For example, a situation may arise which should be tracked, but you don't want all notes and comments made recorded until the facts have been identified. At any stage a draft case can be deleted without trace. Draft cases can be promoted to open status once saved.
• Case Id: Enter in an id to manage & streamline your case list.
• Created By: The creator is populated by the system as the user who is adding the case.
• Title: Enter a title for the case. For example, “Soft dollar changes will have an impact on firm”.
• Case Description: Enter a detailed description for the Case.
• Owner: Select the appropriate individual as the owner from the dropdown list. The owner is the person responsible for the completion of the case. Only one person can be assigned to a single case.
• Priority: Select an appropriate priority from the dropdown list. Priority can be:
• Critical
• High
• Medium
• Low
• Compliance Category: Select the appropriate category from the compliance category dropdown list. The default compliance categories available on the application are:
• Anti-Money Laundering
• Avoidance of Conflict of Interest
• Best Execution
• Books & Records
• Business Continuity
• Client
• Code of Ethics
• Disclosure
• Filings
• Investor Control
• Privacy
• Risk
• Safeguarding Assets
• Trading
• Travel
• Entertainment & Gifts
• US Sanctions or Vendor Oversight.
• Estimated Completion Date: Click the calendar and select the date you want the case to be resolved by.
• Violation: Violation is automatically set to no. If there has been a violation, click 'yes' and the Violation Type field is revealed
• Participants
4. To add Participants to a case, click the button  and from the list of users, select the user you wish to add, and click submit.
This person will receive email notification that they have been added as a participant on the case, and the email will contain a link to the case.
5. You have now completed the mandatory steps to add a case. Optional functionality exists to attach one or more documents to the case.
• Associated Employees
6. To add Associated Employees to a case, click the button  and from the list of users, select the user you wish to add, and click submit.
7. You have now completed the mandatory steps to add a case. Optional functionality exists to attach one or more documents to the case.
8. If you do not wish to attach a document, click Save to complete the case creation.
• An email is sent to the assignee to notify them that a case has been assigned to them.
• The new case is displayed on the Cases list within Compliance Management.
Attaching document(s)
1. Click the plus sign on Attached Documents. The link expands as shown below.

2. To attach a document stored in Firm Documents or Policies and Procedures; click on Attach MyComplianceOfficeDocument.
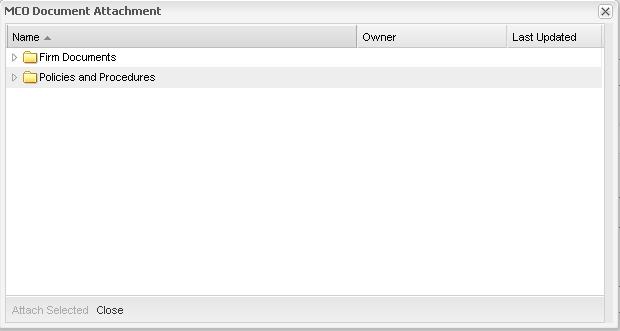
3. Double-click the folder that contains the document(s) you wish to attach. The options are:
• Policies & Procedures – the documents within Policies & Procedures are displayed.
• Firm Documents – the folders within Firm Documents are displayed. Select the folder which contains the document you wish to attach.
4. Highlight the document(s) that you wish to select; and select Attach Selected. The document(s) are added to the case.
5. Alternatively, to add a document from your local drive, click on Attach Document from your computer. The following pop-up window is displayed:
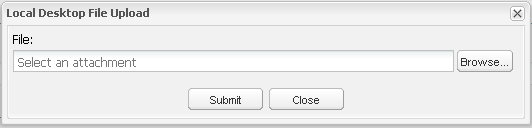
6. Click the Browse button to select a document from the desktop as follows:
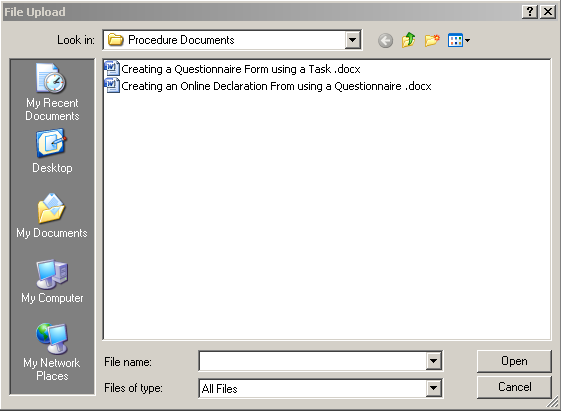
7. Once the document has been selected, click Submit to attach the document to the case as follows:

8. The case is now updated with the document. Click the document name to view the document content.
Created with the Personal Edition of HelpNDoc: Free iPhone documentation generator