Adding a Task
1. Select the MyCompliance tab at the top of the screen and the My Tasks menu option underneath the tabs.
2. Select Add a Task from the Actions list (the section with the pale orange background).
3. The Add a Task input page is displayed.

4. Enter the following information in the Task Details section:
• Title: Enter a title for the new task—for example “Please investigate what is going on with Jon Brown's personal trading”.
• Task Description (Optional field): Enter a description for the task—for example “Jon Brown has been doing a lot of trading but he hasn't submitted his
• Compliance Category: Select the appropriate compliance category from the Compliance Category drop-down list. The default Compliance Categories available on the application are:
• Anti-Money Laundering
• Avoidance of Conflict of Interest
• Best Execution
• Books & Records
• Business Continuity
• Client
• Code of Ethics
• Disclosure
• Filings
• Investor Control
• Privacy
• Risk
• Safeguarding Assets
• Trading
• Travel, Entertainment & Gifts
• US Sanctions
• Vendor Oversight
• Priority: Select the appropriate priority for this task from the dropdown list. Priority can be:
• Critical
• High
• Medium
• Low
• Owner: Select the appropriate owner name(s) from the dropdown list. Only users setup on MyComplianceOffice are available as owner. Completed assignments from the task are assigned back to the owner for review.
• Assign To Users: Select the appropriate assignee name(s) using the Select Assignees button. Only users setup on MyComplianceOffice are available as assignees. Highlight the users in the list, and use the forward and back arrows to select and de-select them as assignees.
• Assign To Groups: Select the appropriate group name(s) using the Group Picker button. All users in each group are automatically selected as assignees. Highlight the groups in the list, and use the forward and back arrows to select and deselect them. Please consult with your MyComplianceOffice Implementation Consultant to have this enabled for your firm.
5. Enter the following information in the Scheduling section:
• Effective Date: From the calendar select the date you want the assignment to be created for users—that is, today or any future date. This defines when the assignee receives the email notification and when the assignment that is, instance of
the task assigned to a specific individual/s at a point in time) appears on the assignee's list of assignments.
• Due Date: From the calendar, select the date you want the assignment to be completed by.
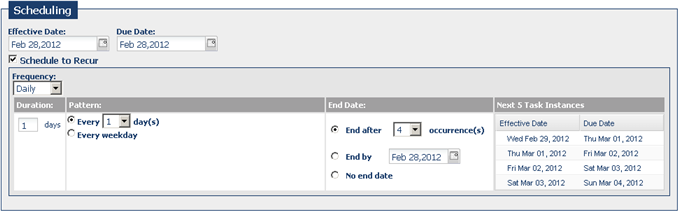
• Schedule to Recur:Make the task recurring to create an additional associated assignment(s) at set intervals. Choose None, Daily, Weekly, Monthly or Yearly as the Frequency to set the pattern. See Next 5 Task Instances to see a preview of the next 5 or less set of effective and due dates for the task. In the example below; an assignment will be generated every day for 4 days.
6. Enter the following information in the Information to Assignees section:
• Instructions to appear to assignee: Enter the instructions for the person who is being assigned the task—for example “Please look into what is going on with Jon – I think he's not following the correct procedures”.
• Provide a connection for user to access data directly from assignment:Check this box, and select one of the three items to provide a link in the user assignment(s) to either of the employee Accounts, Trades, Holdings or Trading Docs pages. This is particularly useful when creating attestation tasks to send to users requesting them to certify their accounts, trades holdings or trading docs.
• Attach a document to the assignment(s):Check this box to attach one or more documents to the task.Documents can be attached from the user’s computer, or from MyComplianceOffice.
• Request assignee(s) to complete a questionnaire: To assign a questionnaire to a task (to appear on all subsequent associated assignments) check the box, and select the questionnaire to be added to the task from the list of available active questionnaires.
• Request attestation statement on completion of assignment(s): To assign a signature to a task (to appear on all associated assignments) check the box, enter the text of the signature in the text box, and select whether signature is required by choosing Yes or No to the ‘Require Attestation Acception’ choice buttons.
7. Enter the following information in the Reminders & Escalations section:
• Configure Reminders—Set reminders for the assignee(s) that generate automatic emails in advance of the due date, and are sent to the assignee(s).
• Configure Escalations—Set an escalation notification which alerts a specific individual if the task is not completed (is overdue) by a certain date.
8. Click Save and Activate to complete the task creation. If you wish to set an optional feature; choose Edit, and select the feature from the list above, make your selection, and click Save.
9. On the effective date, the assignee receives an email notification from MyComplianceOffice informing them that an assignment has been assigned to them.
10. The new task is displayed on the Task list.
11. Each instance of the task is displayed on the Task Instances page when the effective dates for the task are reached.
12. The new assignment(s) per user are displayed on the Assignment List when the effective dates are reached.
Created with the Personal Edition of HelpNDoc: Full-featured EBook editor